Saturday, March 30, 2013
Hello, Memory Bound friends!
Hold on to your Tacky Tape and splat mats because you are not going to believe your eyes! Would you believe that these beautiful flowers were created from used paper towels? It's true!

Our staff member Jean created these beautiful flowers after attending one of Cheryl Mezzetti's recent altered art classes at Memory Bound. Jean had checked out Cheryl's website before class, and from there she linked to designer Marah Johnson's blog where she happened upon a video explaining how to make recycled paper flowers. Jean was so inspired by the video that she decided to give it a try. So after Cheryl's class when Kellie was tidying up the classroom, Jean wouldn't let Kellie throw away the paper towels she had used to blot her paint brush! "Kellie probably thought I was crazy!" Jean laughed.
Jean had used the paper towels to blot her brush as she worked with Twinkling H2O's, so they needed some drying time. After they were dry, she folded the towels into fourths and cut them into flower shapes using the Tim Holtz Alterations Tattered Florals die in her Big Shot machine. She used all of the flower shapes on the die except the large one with the pointed petals.

After cutting the shapes, Jean layered and secured them with a large brad, "scrunching" the layers with her fingers to create fullness. She experimented with different combinations of flower shapes, sometimes using a mini-brad along with the smallest die cut flower to create blooms that resemble rose buds in the center.
I'm completely amazed by Jean's recycled flowers and can't wait to make some myself! Thanks, Jean, for inspiring us to use something that would normally be discarded to create art!
Janet
Thursday, March 28, 2013
Hello, Memory Bound friends!
I recently had the opportunity to see a project that our store manager Diane just finished: An incredible album about a trip to Key West. Diane's project completely amazed me, and it was evident how much she loved creating it! Each page is packed with details that really capture the flavor of Key West. So grab a cup of coffee (or a margarita!) and join me to take a peek inside her beautiful album! You can click on any of the photos for a closer look.
As you can see, Diane created a lot of pages for her album. She plans to bind it with some very large metal rings.

Diane used the We R Memory Keepers Down the Boardwalk line throughout her album. Choosing a single paper line is a great way to create a cohesive look and feel in a project like this one.
The cover of the album (a chipboard base covered with patterned paper) measures approximately 9.5x9.5. I love how she combined the metal bicycle and bicycle motif on the cover -- perfect for this trip, as they often rode bicycles while there! Diane also incorporated strips of burlap which she frayed to lend a natural, textured feel.

As you look at the pages of her album, you'll see that they are all different sizes and shapes. Diane used the Elegant Edges Cricut cartridge to cut many of the page shapes. This variety makes her album fun and eclectic!
Diane also used the Tim Holtz Alterations Tattered Florals die to cut flowers from patterned paper. She layered and secured the flowers with brads for additional texture and interest throughout her album.

Diane always makes a point of taking lots of pictures, including posed and action shots.

It's fun to make a ring-bound album because you're not constrained by page protectors! As you can see below, Diane extended elements off the top and sides of her pages.

I love how she kept track of the food they enjoyed while on vacation, then created a "meal plan" chart on the computer.

Diane used a lot of twine and Washi Tape in her album for a casual, modern feel. She also incorporated several items from her stash, including some "flash cards" which worked great with her theme.

Diane loves to layer papers! This is easy and fun to do if you're working with a coordinated paper line because all the colors and patterns are designed to work together, as you can see in the photo below. She also created banners for several pages using our nesting metal banner dies by Xcut.

This page opens up to reveal more photos!

Simple Stories divided page projectors worked perfectly with Diane's album. She added a few here and there and filled them with wallet-sized photos.

I love how she added the "hanging" banner on this page to capture the feel of outdoor dining in Key West!

Notice the variety of texture Diane created in her album by using different kinds of paper, burplap, and dimensional embellishments.

For this page, Diane ran the flash card through her printer to add the blue text. I love this idea!

More pages from her project...


Diane always makes time for photography on her trips, and it pays off with beautiful images like this one. This could be a postcard!

Thanks to Diane for sharing her amazing Key West album with us! If her project has inspired you to scrapbook your own vacation memories, stop in and let us help you get started. We've got everything you need to create a beautiful album you'll treasure for years to come!
Janet
Wednesday, March 13, 2013
Hello, Memory Bound friends!
If you're a card maker, you'll love the Iris Card Keeper box we carry at Memory Bound! This roomy box (just $12.99) comes with dividers you can label to organize your inventory of handmade cards. And, as you'll see in this post, you can fill a box with cards for a wonderful, thoughtful gift! Our staff member Betsy has been working on a box of cards for her husband's grandma, so I asked her to tell us a bit about this project.
If you're a card maker, you'll love the Iris Card Keeper box we carry at Memory Bound! This roomy box (just $12.99) comes with dividers you can label to organize your inventory of handmade cards. And, as you'll see in this post, you can fill a box with cards for a wonderful, thoughtful gift! Our staff member Betsy has been working on a box of cards for her husband's grandma, so I asked her to tell us a bit about this project.

Betsy Knoblock Grabinski, Memory Bound Staff Member
Between my husband Brent and I, we only have one living grandparent - his maternal grandmother. The family calls her “Grandma Bert” (her first name is Roberta), but I call her G-ma Small (Small is her last name) because she’s spunky and fun and loves to spend time with the family more than anything else. She still lives by herself on the family farm just north of Storm Lake.
One thing we can always count on is that G-ma Small will never forget a birthday or anniversary. A friend or sibling may just post on Facebook these days, but G-ma Small sends a card via snail mail to let you know she’s thinking about you. The card usually includes a short letter and always a $15 check. My husband is now 43 and since 1971 has received a $15 check annually from her. There has been no rise in the amount and everyone gets the same amount. She’s also likely to remind you if you don’t cash the check promptly because she doesn’t like her checking balance to be off. :)
With nearly 50 people on her birthday list, the one thing she needs is cards. Since I now have a full selection of decorative paper being stored in my home, I thought it would be a great gift to make cards for her to send to the family. Yes, it was originally a Christmas gift and no, I am still not done now that it’s March, but I did recruit Brent’s sister to help make some cards and I’m attempting to get at least a supply to her soon.

The one thing I identified early in the process was that the cards needed to be designed for a variety of audiences. Her kids are in their early 60’s, the grandkids are in their 30’s and the great grandkids range from teenagers to a newborn. A card for a 6-year-old girl wouldn’t be the same as one for Brent’s dad. I made a list of all of the family members and determined how many cards I would need of each kind. My categories were young kids, older kids, adult females, adult males and anniversaries.

I also wanted to make it easy for Grandma to pull out the type of card she
needed. I bought one of the Iris card organizer boxes and labeled to tabs for
each type of card I was making. The box has also helped me keep tabs on how
many cards I have made. I ended up adding sympathy cards and a space for
general/blank cards since I know how important it is to her to keep in touch
with her family and friends, no matter what the occasion.


This is G-ma Small with Abbie, Betsy's niece.

Here are a few more wonderful cards from Betsy's card box:


Many thanks to Betsy for sharing her great gift idea with us! Stop in soon to take a look at the Iris Card Keepers. Then put one to use by organizing your own inventory of cards...or fill it with cards for someone special!
Janet
Saturday, March 2, 2013
Hello, Memory Bound friends!
Even though we have several inches of snow on the ground, the calendar assures us that spring is just around the corner! And that means it's time to decorate for Easter! It's fun to update your springtime holiday decorations with a fresh new project or two.
Here's a wonderful Easter banner designed by Dawn which you can easily create in an afternoon this weekend. If you've got crafty kids who are ready for spring, they'll enjoy helping!

To make a banner, you'll start with pre-made chipboard pennant pieces. We carry them in a variety of styles and sizes -- just chose the styles you like best for your banner.

You can select any paper you'd like to cover the chipboard pieces. You'll simply trace and cut paper to fit each banner piece and glue it in place. To make quick and easy work of that step, Dawn used her Xyron 250 and 510 to adhere the paper and letters to the banners. Simply roll the pieces through the machine to automatically add adhesive to the back sides! How easy is that? All of us at Memory Bound LOVE our Xyron machines!

Dawn chose Easter papers by one of our favorite companies (they're from Iowa!), Moxxie. She used Tea Dye Distress Ink on all of the pieces of her banner to create a lightly distressed look. I like this particular color with lighter springtime papers! The butterfly (used on the "e" pennant) and bunny (used on the "r" pennant) were created with a Tim Holtz Alterations die board and the Big Shot die cutting machine.

Dawn cut the "EASTER" letters from yellow cardstock in our Accu Cut die cutting center using the Typewriter font. She inked them and smeared Mustard Seed Distress Stickles on the letters for a bit of sparkle.

Love that chocolate bunny! This die board could be used on so many springtime projects -- cards, Easter treat baskets, gift bags, and much more.
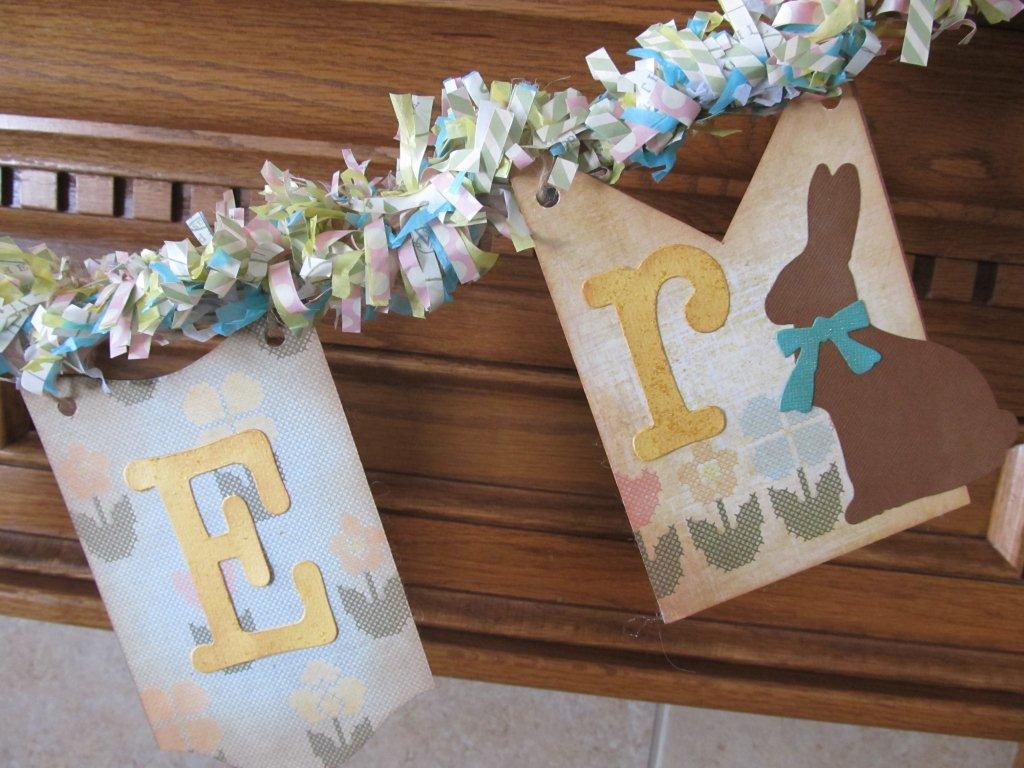
Dawn tied the pennant pieces to the Happy Spring garland. We have garland in a variety of colors!

Here's a close up of the garland Dawn used. I love how full and fluffy it is!

Update your springtime decorations with a banner of your own! Just stop in and let us help you get started!
Happy weekend crafting!
Janet
Subscribe to:
Posts (Atom)


.JPG)

