Hello, Memory Bound friends!
I don't know about you, but the start of a new year always makes me want to get organized. (February still counts as the start of a new year, right?) So I've been tackling a number of areas in my household, including my craft area, trying to rid out the items I no longer need and devise storage solutions that will work for me now and into the future.
I don't know about you, but the start of a new year always makes me want to get organized. (February still counts as the start of a new year, right?) So I've been tackling a number of areas in my household, including my craft area, trying to rid out the items I no longer need and devise storage solutions that will work for me now and into the future.
One of my favorite recent projects was re-organizing my acrylic and cling stamps. Like many other crafters, I decided to move my stamps into the Avery Elle Stamp Pockets. We first blogged about this product last year. It has taken me awhile to get to this project, but it was well worth the wait!
Here's a look at the BEFORE and AFTER of my stamp situation!
Previously I had some of my acrylic stamps stored in CD cases. Over time, this didn't work out so well. Many of today's stamp sets are much too large for CD cases. I also found that some stamps stick like CEMENT to the plastic! :( Suffice it to say this system was definitely not working for me, so I also had stamps stored in various other places. Long story short...my stamps were scattered all about, making it hard to remember (and even harder to find!) what I had. As a result, I wasn't using my stamps as often as I wanted.
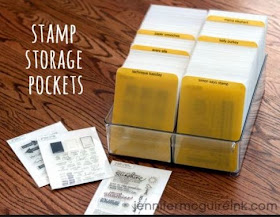
I first learned about stamp pockets on Jennifer McGuire's blog and the beauty of her system brought a tear to my eye! :) See her video HERE.
Here's what Jennifer's system looks like. Wow, how clean and beautiful!
So I jumped into this project head first! I removed my stamps from the CD cases. Some stuck so much that THEY ACTUALLY BROKE THE PLASTIC trying to remove them. Not good! I also had stamps stored in other bins and boxes and set aside a few sets I no longer need to sell in the next Memory Bound Garage Sale (planned for April...watch for details).
I needed to replace the plastic on a few sets, so I purchased 12x12 sheets of transparency at Memory Bound and cut them down to fit the stamp pockets. It's easy to slide the sheet in and out of the pocket.
I made labels for the pockets using Word. (You could do this with a label maker, too, of course.) I cut them out and adhered them to the top of each pocket. Labeling stuff makes me very happy! :)
Here's what the stamp pockets look like when filled. Be still my heart! :)
Following
Jennifer McGuire's recommendation, I slipped a piece of white
cardstock into each pocket for extra stability. It also helps the whole
system look a bit neater.
Jennifer uses Fridge Binz to store her stamps, but I wanted something a bit more decorative to match my craft space. Luckily I found a basket at Target that was just the perfect size for the pockets and just the right depth for the cube where I plan to store them. It was big enough to accommodate my larger stamp sets at the back. I made a label for the front using my Big Shot.
Jennifer uses Fridge Binz to store her stamps, but I wanted something a bit more decorative to match my craft space. Luckily I found a basket at Target that was just the perfect size for the pockets and just the right depth for the cube where I plan to store them. It was big enough to accommodate my larger stamp sets at the back. I made a label for the front using my Big Shot.
This new system makes me super happy! If you are looking for a new way to organize your stamps, I would highly recommend the Avery Elle Stamp Pockets. Stop in or give us a call at (515) 965-1102!
Happy organizing!
Janet


I've done this too. So much better! !!
ReplyDelete